Category Archives: UNIX & Linux

How expiration dates in the shadow file really work

tl;dr: Accounts expire as soon as UTC reaches the expiration date.
In today‘s installment of my classic shame-inducing series “UNIX basics for UNIX professionals”, I want to talk about account (and password) expiration in /etc/shadow on Linux.
The expiration time is specified as days since january 1st, 1970. In the case of account expiration, the according value can be found in the second to last field in /etc/shadow.
Account expiration can be configured using the option „-E“ to the „chage“ tool. In this case, I want the user „games“, which I‘ll be using for demonstration purposes, to expire on the 31st of december, 2017:

# chage -E 2017-12-31 games

Using the „-l“ option, I can now list the expiration date of the user:

# chage -l games
[…]
Account expires : Dec 31, 2017
[…]

The first thing to be taken away here is that, as I can only use a number of days, I can not let a user expire at any given time of day. In /etc/shadow, I have now:

# getent shadow | awk -F: '/^games:/{print $8}'
17531

This of course can to be converted to a readable date:

# date --date='1970-01-01 00:00:00 UTC 17531 days'
Sun Dec 31 01:00:00 CET 2017

So, will the account still be usable on december 31st? Let‘s change it‘s expiration to today (the 7th of July, 2017) to see what happens:

# date
Fri Jul 7 12:58:32 CEST 2017
# chage -E today games
# chage -l games
[…]
Account expires : Jul 07, 2017
[…]
# su - games
Your account has expired; please contact your system administrator
[…]

I’m now only left with the question whether this expiration day is aligned on UTC or local time.

# getent shadow | awk -F: '/^games:/{print $8}'
17354
# date --date='1970-01-01 00:00:00 UTC 17354 days'
Fri Jul 7 02:00:00 CEST 2017

I‘ll stop my NTP daemon, manually set the date to 00:30 today and see if the games user has already expired:

# date --set 00:30:00
Fri Jul 7 00:30:00 CEST 2017
# su - games
This account is currently not available.

This is the output from /usr/sbin/nologin, meaning that the account is not expired yet, so I know for sure that the expiration date is not according to local time but to UTC.
Let‘s move closer to our expected threshold:

# date --set 01:30:00
Fri Jul 7 01:30:00 CEST 2017
# su - games
This account is currently not available.

Still not expired. And after 02:00:

# date --set 02:30:00
Fri Jul 7 02:30:00 CEST 2017
# su - games
Your account has expired; please contact your system administrator

So, in order to tell from a script whether an account has expired, I simply need to get the number of days since 1970-01-01. If this number is greater or equal to the value in /etc/shadow, the user has expired.

DAYSSINCE=$(( $(date +%s) / 86400 )) # This is days till now as per UTC.
EXPIREDAY=$(getent shadow | awk -F: '/^games:/{print $8}')
if [[ $DAYSSINCE -ge $EXPIREDAY ]] # Greater or equal
then
    EXPIRED=true
fi

One last thought: We’ve looked at a time zone with a small offset from UTC. What about timezones with larger offsets, in the other direction?

  • If we move the timezone to the east, further into the positive from UTC, it will behave the same as here in CEST and the account will expire sometime during the specified day, when UTC hits the same date.
  • If we move the timezone far to the west, like e.g. PST, and an absolute date is given to “chage -E“, the account will probably expire early, the day before scheduled expiration. I was not able to find anything useful on the web and even my oldest UNIX books from the 1990s mention password expiration only casually, without any detail. Active use of password expiration based on /etc/shadow seems to be uncommon. The code that seems to do the checking is here and it does not appear to care about time zones at all.
  • Any comments that clarify the behaviour in negative offsets from UTC will be appreciated.

SSH firewall bypass roundup

So my SSH workflow has reached a turning point, where I’m going to clean up my ~/.ssh/config. Some entries had been used to leverage corporate firewall and proxy setups for accessing external SSH servers from internal networks. These are being archived here for the inevitable future reference.
I never use “trivial” chained SSH commands, but always want to bring up a ProxyCommand, so I have a transparent SSH session for full port, X11, dynamic and agent forwarding support.
ProxyCommand lines have been broken up for readability, but I don’t think this is supported in ~/.ssh/config and they will need to be joined again to work.
Scenario 1: The client has access to a server in a DMZ
The client has access to a server in an internet DMZ, which in turn can access the external server on the internet. Most Linux servers nowadays have Netcat installed, so this fairly trivial constellation works 95.4% of the time.

# ~/.ssh/config
Host host.external
ServerAliveInterval 10
ProxyCommand ssh host.dmz /usr/bin/nc -w 60 host.external 22

Scenario 2: As scenario 1, but the server in the DMZ doesn’t have Netcat
It may not have Netcat, but it surely has an ssh client, which we use to run an instance of sshd in inetd mode on the destination server. This will be our ProxyCommand.

# ~/.ssh/config
Host host.external
ServerAliveInterval 10
ProxyCommand ssh -A host.dmz ssh host.external /usr/sbin/sshd -i

Scenario 2½: Modern version of the Netcat scenario (Update)
Since OpenSSH 5.4, the ssh client has it’s own way of reproducing the Netcat behavior from scenario 1:

# ~/.ssh/config
Host host.external
ServerAliveInterval 10
ProxyCommand ssh -W host.external:22 host.dmz

Scenario 3: The client has access to a proxy server
The client has access to a proxy server, through which it will connect to an external SSH service running on Port 443 (because no proxy will usually allow connecting to port 22).

# ~/.ssh/config
Host host.external
ServerAliveInterval 10
ProxyCommand /usr/local/bin/corkscrew
   proxy.server 3128
   host.external 443
   ~/.corkscrew/authfile
# ~/.corkscrew/authfile
username:password

(Omit the authfile part, if the proxy does not require authentication.)
Scenario 4: The client has access to a very restrictive proxy server
This proxy server has authentication, knows it all, intercepts SSL sessions and checks for a minimum client version.

# ~/.ssh/config
Host host.external
ServerAliveInterval 10
ProxyCommand /usr/local/bin/proxytunnel
   -p proxy.server:3128
   -F ~/.proxytunnel.auth
   -r host.external:80
   -d 127.0.0.1:22
   -H "User-Agent: Mozilla/5.0 (X11; Ubuntu; Linux x86_64; rv:29.0) Gecko/20100101 Firefox/29.0\nContent-Length: 0\nPragma: no-cache"
# ~/.proxytunnel.auth
proxy_user=username
proxy_passwd=password

What happens here:

  1. host.external has an apache web server running with forward proxying enabled.
  2. proxytunnel connects to the proxy specified with -r, via the corporate proxy specified with -p and uses it to connect to 127.0.0.1:22, on the forward-proxying apache.
  3. It sends a hand-crafted request header to the intrusive proxy, which mimics the expected client version.
  4. Mind you that although the connection is to a non-SSL service, it still is secure, because encryption is being brought in by SSH.
  5. What we have here is a hand-crafted exploit against the know-it-all proxy’s configuration. Your mileage may vary.

Super sensible discretion regarding the security of your internal network is advised. Don’t fuck up, don’t use this to bring in anything that will spoil the fun. Bypass all teh firewalls responsibly.

CentOS 7 on MD-RAID 1

Figuring this out took me quite a bit of time. In the end, I approached the starter of this hilariously useless CentOS mailing list thread, who assured me that indeed he had found a way to configure MD-RAID in the installer, and behold, here’s how to install CentOS 7 with glorious old-school software RAID.
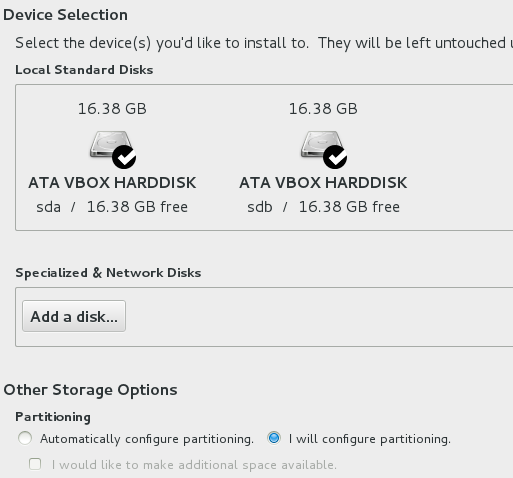
In the “Installation Destination” screen, select the drives you want to install onto and “I will configure partitioning”. Then click “Done”:
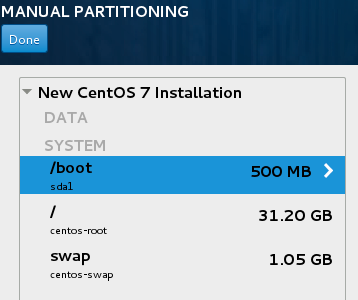
20141025134323In the “Manual Partitioning” screen, let CentOS create the partitions automatically, or create your own partitioning layout. I will let CentOS create them automatically for this test. 20141025134926Apparently due to restrictions in the Installer, /boot is required, but can’t be on a logical volume, so it appears as primary partition /dev/sda1. The root and swap volumes are in a volume group named centos.
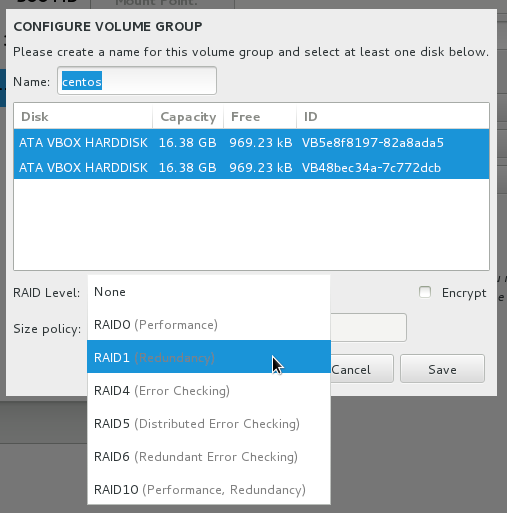
The centos volume group will need to be converted to RAID 1 first. Select the root volume and find the “Modify…” button next to the Volume Group selection drop-down. A window will open. In this window, make sure both drives are selected and select “RAID 1 (Redundancy)” from the “RAID Level” drop-down. Repeat this for all volumes in the centos volume group.  If you are using the automatic partition layout, note at this point, how, after this step, the file system sizes have been reduced to half their size.
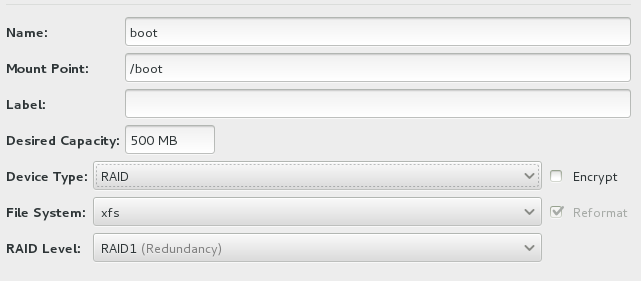
20141025135637As the final step, select the /boot entry and use the “Device Type” drop-down to convert /boot to a “RAID” partition. A new menu will appear, with “RAID 1 (Redundancy)” pre-selected. The sda1 subscript below the /boot file system will change into the “boot” label once you click anywhere else in the list of file systems.
20141025140445Click “Done”, review the “Summary of Changes”, which should immediately make sense if you have ever configured MD-RAID, and the system will be ready for installation.

What does the slash in crontab(5) actually do?

That’s a bit of a stupid question. Of course you know what the slash in crontab(5) does, everyone knows what it does.
I sure know what it does, because I’ve been a UNIX and Linux guy for almost 20 years.
Unfortunately, I actually didn’t until recently.
The manpage for crontab(5) says the following:
20141017150008
It’s clear to absolutely every reader that */5 * * * * in crontab means, run every 5 minutes. And this is the same for every proper divisor of 60, which there actually are a lot of: 2, 3, 4, 5, 6, 10, 12, 15, 20, 30
However, */13 * * * * does not mean that the job will be run every 13 minutes. It means that within the range *, which implicitly means 0-59, the job will run every 13th minute: 0, 13, 26, 39, 52. Between the :52 and the :00 run will be only 8 minutes.
Up to here, things look like a simple modulo operation: if minute mod interval equals zero, run the job.
Now, let’s look at 9-59/10 * * * *. The range starts at 9, but unfortunately, our naive modulo calculation based on wall clock time fails. Just as described in the manpage, the job will run every 10th minute within the range. For the first time at :09, after which it will run at :19 and subsequently at :29, :39, :49 and :59 and then :09 again.
Let’s look at a job that is supposed to run every second day at 06:00 in the morning: 0 6 */2 * *. The implied range in */2 is 1-31, so the job will run on all odd days, which means that it will run on the 31st, directly followed by the 1st of the following month. The transitions from April, June, September and November to the following months will work as expected, while after all other months (February only in leap years), the run on the last day of the month will be directly followed by one on the next day.
The same applies for scheduled execution on every second weekday at 06:00: 0 6 * * */2. This will lead to execution on Sunday, Tuesday, Thursday, Saturday and then immediately Sunday again.
So, this is what the slash does: It runs the job every n steps within the range, which may be one of the default ranges 0-59, 0-23, 1-31, 1-11 or 0-7, but does not carry the remaining steps of the interval into the next pass of the range. The “every n steps” rule works well with minutes and hours, because they have many divisors, but will not work as expected in most cases that involve day-of-month or day-of-week schedules.
But we all knew this already, didn’t we?

OpenSSH connection multiplexing

The Challenge
I was in touch with a developer the other day who used SSH to programmatically connect to a remote machine where he would start some kind of processing job. Unfortunately, he was in trouble when he wanted to kill the remote process. Killing the local SSH client would leave his job active. He claimed that there used to be some sort of signal forwarding feature in OpenSSH on the machine where he had developed his application in OpenSSH 3.x days, but this feature seems to have been removed by now.
I wasn’t able to confirm anything of this, but this gentleman’s problem got me curious. I started to wonder: Is there some kind of sideband connection that I might use in SSH to interact with a program that is running on a remote machine?
The first thing I thought of were port forwards. These might actually be used to maintain a control channel to a running process on the other side. On the other hand, sockets aren’t trivial to implement for a /bin/ksh type of guy, such as the one I was dealing with. Also, this approach just won’t scale. Coordination of local and remote ports is bound to turn into a bureaucratic nightmare.
I then started to skim the SSH man pages for anything that looked like a “sideband”, “session control” or “signaling” feature. What I found, were the options ControlMaster and ControlPath. These configure connection multiplexing in SSH.
Proof Of Concept
Manual one-shot multiplexing can be demonstrated using the -M and -S options:
1) The first connection to the remote machine is opened in Master mode (-M). A UNIX socket is specified using the -S option. This socket enables the connection to be shared with other SSH clients:

localhost$ ssh -M -S ~/.ssh/controlmaster.test.socket remotehost


2) A second SSH session is attached to the running session. The socket that was opened before is specified with the -S option. The remote shell opens without further authentication:

localhost$ ssh -S ~/.ssh/controlmaster.test.socket remotehost


The interesting thing about this is that we now have two login sessions running on the remote machine, who are children of the same sshd process:

remotehost$ pstree -p $PPID
sshd(4228)─┬─bash(4229)
           └─bash(4252)───pstree(4280)


What About The Original Challenge?
Well, he can start his transaction by connecting to the remote machine in Master mode. For simplicity’s sake, let’s say he starts top in one session and wants to be able to kill it from another session:

localhost$ ssh -t -M -S ~/.ssh/controlmaster.mytopsession.socket remotehost top


Now he can pick up the socket and find out the PIDs of all other processes running behind the same SSH connection:

localhost$ ssh -S ~/.ssh/controlmaster.mytopsession.socket remotehost 'ps --ppid=$PPID | grep -v $$'
  PID TTY          TIME CMD
 4390 pts/0    00:00:00 top


This, of course, leads to:

localhost$ ssh -S ~/.ssh/controlmaster.mytopsession.socket remotehost 'ps --no-headers -o pid --ppid=$PPID | grep -v $$ | xargs kill'


Then again, our shell jockey could just use PID or touch files. I think this is what he’s doing now anyway.
Going Fast And Flexible With Multiplexed Connections
With my new developer friend’s troubles out of the way, what else could be done with multiplexed connections? The SSH docs introduce “opportunistic session sharing”, which I believe might actually be quite useful for me.
It is possible to prime all SSH connections with a socket in ~/.ssh/config. If the socket is available, the actual connection attempt is bypassed and the ssh client hitches a ride on a multiplexed connection. In order for the socket to be unique per multiplexed connection, it should be assigned a unique name through the tokens %r (remote user), %h (remote host) and %p (destination port):

ControlPath ~/.ssh/controlmaster.socket.%r.%h.%p
# Will create socket as e.g.: ~/.ssh/controlmaster.socket.root.remotehost.example.com.22


If there is no socket available, SSH connects directly to the remote host. In this case, it is possible to automatically pull up a socket for subsequent connections using the following option in ~/.ssh/config:

ControlMaster auto


So Where’s The Actual Benefit?
I use a lot of complex proxied SSH connections who take ages to come up. However, connecting through an already established connection goes amazingly fast:

# Without multiplexing:
localhost$ time ssh remotehost /bin/true
real    0m1.376s
...
# With an already established shared connection:
localhost$ time ssh remotehost /bin/true
real    0m0.129s
...


I will definitely give this a try for a while, to see if it is usable for my daily tasks.
Update, 2009/05/04: No, it isn’t. Disconnecting slave sessions upon logout of the master session are too much of a nuisance for me.
Using the SSH agent from daemon processes

One of my more recent installations, the BackupPC server I wrote about earlier, needs full access as the user root to his clients in order to retrieve the backups. Here’s how I implemented authentication on this machine.
BackupPC runs as its own designated user, backuppc. All authentication procedures therefore happen in the context of this user.
The key component in ssh-agent operation is a Unix domain socket that the ssh client uses to communicate with the agent. The default naming scheme for this socket is /tmp/ssh-XXXXXXXXXX/agent.<ppid>. The name of the socket is stored in the environment variable SSH_AUTH_SOCK. The windowing environments on our local workstations usually run as child processes of ssh-agent. They inherit this environment variable from their parent process (the agent) and therefore the shells running inside our Xterms know how to communicate with it.
In the case of a background server using the agent, however, things are happening in parallel: On one hand, we have the daemon which is being started on bootup. On the other hand, we have the user which the daemon is running as, who needs to interactively add his SSH identity to the agent. Therefore, the concept of an automatically generated socket path is not applicable and it would be preferable to harmonize everything to a common path, such as ~/.ssh/agent.socket.
Fortunately, all components in the SSH authentication system allow for this kind of harmonization.
The option -a to the SSH agent allows us to set the path for the UNIX domain socket. This is what this small script, /usr/local/bin/ssh-agent-wrapper.sh does on my backup server:

#!/bin/bash
SOCKET=~/.ssh/agent.socket
ENV=~/.ssh/agent.env
ssh-agent -a $SOCKET > $ENV


When being started in stand-alone mode (without a child process that it should control), ssh-agent outputs some information that can be sourced from other scripts:

SSH_AUTH_SOCK=/var/lib/backuppc/.ssh/agent.socket; export SSH_AUTH_SOCK;
SSH_AGENT_PID=1234; export SSH_AGENT_PID;
echo Agent pid 1234;


This file may sourced from the daemon user’s ~/.bash_profile:

test -s .ssh/agent.env && . .ssh/agent.env


However, this creates a condition where we can’t bootstrap the whole process for the first time. So it might be somewhat cleaner to just set SSH_AUTH_SOCK to a fixed value:

export SSH_AUTH_SOCK=~/.ssh/agent.socket


Here’s the workflow for initializing the SSH agent for my backuppc user after bootup:

root@foo:~ # su - backuppc
backuppc@foo:~ $ ssh-agent-wrapper.sh
backuppc@foo:~ $ ssh-add


In the meantime, what is happening to the backuppc daemon?
In /etc/init.d/backuppc, I have added the following line somewhere near the top of the script:

export SSH_AUTH_SOCK=~backuppc/.ssh/agent.socket


This means that immediately after boot-up, the daemon will be unable to log on to other systems, as long as ssh-agent has not been initialized using ssh-agent-wrapper.sh. After starting ssh-agent and adding the identity, the daemon will be able to authenticate. This also means that tasks in the daemon that do not rely on SSH access (in the case of BackupPC, things like housekeeping and smbclient backups of “Windows” systems) will already be in full operation.

Swap im Reality Check

Swap unter Linux scheint so eine Sache zu sein, um die sich reichlich Mythen und Legenden ranken. Deshalb schreibe ich heute mal auf, was ich so von der Sache halte.
Wie wir alle wissen, wird der Swap-Bereich zusammen mit dem realen Arbeitsspeicher (RAM) zum sogenannten Virtual Memory (VM) zusammengefaßt. Auf einem System mit 2 GB RAM und 2 GB Swap steht also ein für Appikationen nutzbares VM von 4 GB zur Verfügung. Die Hälfte davon befindet sich als Swap auf Festplatte. Zugriffe darauf sind sehr viel langsamer als Zugriffe auf den normalen Arbeitsspeicher.
Mythos: “Jedes UNIX-System braucht Swap!”
Swap ist nicht mehr als eine sehr, sehr langsame Speichererweiterung. Ist der Arbeitsspeicher voll, werden Speichersegmente auf Festplatte ausgelagert. Dadurch, daß diese Auslagerung deutlich langsamer als normale RAM-Aktiviät geschieht, wird das System in aller Regel extrem langsam. Diese Auslagerungsaktivität kann im Rahmen einer Überwachung erkannt werden. Idealerweise wird auch die Problemquelle identifiziert und der entsprechende Prozeß von Hand beendet, so daß das System weiterlaufen kann.
Daraus folgt im Prinzip nichts anderes, als daß Swap nichts weiter bringt, als einen gefühlten Zeitgewinn für das Beenden von Speicherfressern.
Auf der Hand liegt andererseits auch, daß man z.B. ein Flash-basiertes (und damit read-only)-System ohne Swap betreiben können muß. Folglich gilt, daß ein Linux-System ohne Swap problemlos laufen kann, solange der Arbeitsspeicher für den gesamten Speicherbedarf aller zu benutzenden Applikationen ausreichend dimensioniert ist.
Mythos: “Swap muß immer auf einer eigenen Partition liegen!”
Unter Linux (und vermutlich auch den meisten anderen UNIX-Systemen) ist es problemlos möglich, anstelle einer Swap-Partiton ein Swapfile zu verwenden. Die Vorgehensweise dazu ist dort in der Manpage von mkswap beschrieben. Da ein swappendes System ohnehin ein schweres Problem mit der Performance von Speicherzugriffen hat, kann man den marginalen zusätzlichen Performanceverlust durch die Dateisystemebene praktisch vernachlässigen. (Eine Ausnahme gilt, die erwähne ich im übernächsten Absatz.)
Mythos: “Es muß immer doppelt soviel Swap vorhanden sein, wie Arbeitsspeicher!”
Das ist so eine ganz alte Daumenregel, deren historischer Hintergrund schwer durchschaubar ist. Sie ist vermutlich teilweise darin begründet, daß es UNIX-Systeme gegeben haben soll, bei denen der Arbeitsspeicher auf Swap gespiegelt wurde. Um also eine wirksame Vergrößerung des VM durch Swap zu haben, war also wesentlich mehr Swap als Arbeitsspeicher erforderlich.
Eine Mindestgröße für Swap ergibt sich bei tragbaren Systemen, die für die Hibernation ihren Arbeitsspeicher auf Swap auslagern. Dies ist meines Wissens die einzige Situation, in der nicht nur eine wirkliche Mindestgröße für Swap vorliegt, sondern in der es sich auch tatsächlich um eine Swap-Partition handeln muß.
Generell gilt, daß es über die altbekannte Daumenregel hinaus keine feststehende Regel für die Swap-Größe gibt. Wer sich an der alten Regel festhalten will, darf das gern tun. Man sollte sich aber durchaus fragen, welche Dinge man von einem System mit 8, 16 oder 32 GB Swap zu erwarten glaubt.
Mythos: “Aber tmpfs braucht Swap!”
Nur um dem unvermeidlichen Kommentar vorzubeugen: Das tmpfs-Dateisystem, z.B. unter Solaris und Linux, braucht nicht Swap, sondern Virtual Memory. Es wird also bei ausreichenden Platzverhältnissen im Arbeitsspeicher gehalten, kann aber von Applikationen auf Swap verdrängt werden. Es stellt sich die Frage, inwieweit ein dediziertes Filesystem für /tmp überhaupt eine Berechtigung hat, wenn seine Schreib- und Leseperformance im Prinzip unvorhersagbar sind.